|
Intro - Part 1 - Part 2 - Part 3 - Part 4 Part 1: setting up the environmentWhat's it aboutIt's a simple no-frills todo list, with very limited functionality. The aim of this tutorial is just to show you how to let amalegeni assist you and speed up your development of a GWT project. Get started
Launch Eclipse and click on the File -> Import... menu item. Choose "Existing Projects into Workspace".
We are not making use of the GreetingService files that were generated by the webAppCreator, so please delete GreetingServiceAsync.java, GreetingService.java and GreetingServiceImpl.java. And also remove the reference to them in the war/WEB-INF/web.xml file.
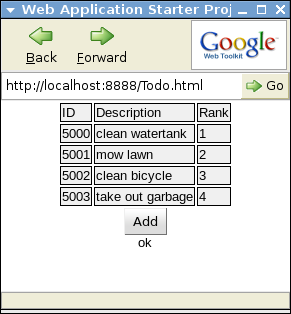
Edit the war/Todo.html file and remove everything between the <body> and </body> tag. Setup the database user, table and sequenceAs postgres superuser create a database user and database: Logon as the newly created 'todo' user (who has the highly secretive password 'todo'), then create the todo table and also a sequence to be used for the primary key: .. and let's insert some values .. Check. Execute following SQL query to see if there is data in your table now: If you get the following result, then we are good, and you may exit the psql-client by entering \q. Setup amalegeniNow let amalegeni generate the skeleton files for you: This is a once-only task, that you'll only do at the start of your project. Note: the GWT webAppCreator was run in the parent-directory of your project, which is in this case directory 'workspace'. The amalegeni tool should be run in the root-directory of your project, in this case 'workspace/Todo'. Don't forget. The generated output shows which files were generated: Have a look at the files. If you don't see them in Eclipse, then highlight the 'src' directory and hit key 'F5' to refresh the file list. BaseService is the super class for the service class, and contains code to create a database connection. Don't dare to put this code in production, it's a very basic way of creating database connections. At least consider using a connection pool. ApplicationException is a general purpose exception, which implements IsSerializable so that it can be thrown across the wire (unlike the SQLException). Don't fear to use this class in production code, it's rock solid (no surprise it only contains 3 lines of code...). Please feel encouraged to change at least the BaseService, only ApplicationException it is production worthy! The Todo.mlg file is where you define one or more beans, and the service methods that define the sql to be executed in the db. A developer will typically create a number of these *.mlg files, with the definitions of the jdbc boilerplate code to generate. The gwt.stg file is one that you'll probably not touch, at least not in the beginning. But it won't hurt to have a look at this StringTemplate which determines how the files generated from the .mlg file, will look like. If you like it, then dig deeper on this page, which tells you how to roll your own template. More about the syntax used can be found on http://www.stringtemplate.org. It's clear that a client/server application and a GWT project will have different StringTemplates, but why is there also a difference between databases (eg. postgresql vs oracle) ? 80% of the template for postgresql and oracle is the same, it's only the bits for PL-SQL that are different, because Oracle uses a different Type for returning pl-sql results via JDBC. Next stepIn this step happens the core business of amalegeni, to use the definitions of Todo.mlg to generate the code for the bean, service, asyncservice and service implementation. Run Amalegeni as follows: This will generate the following files: The package definitions in file Todo.mlg: tells amalegeni the location of the generated files. It's a good habit to let these files land in a directory with a distinct name like 'generated', so that it's easy to clean up all these files automatically (eg. in your ant's build.xml file). Now have a look at the generated java files. If you don't see them in Eclipse, then highlight the 'src' directory and hit 'F5' to refresh the file list. The last one, TodoService-cut-and-paste.txt, contains some code-snippets you may find handy. Adding bodyOpen the file myapp.client.Todo.java in Eclipse, and remove all the code of the body of this class and replace it by this: The above first declares a few class variables, and then defines the the onModuleLoad() method of your GWT application. The code in the method refreshTodolist() was copied from a snippet found in the cut and paste file that was generated by amalegeni. Let Eclipse pull in the import statementsClick Source -> Organize imports to get all the import statements added to your source file, which should give you something similar to this: Now there should be no more 'red flags' or compile errors in your code. Update the web.xmlPut this in the war/WEB-INF/web.xml file (the above snippet can be found in TodoService-cut_and_paste.txt). Remove any servlet definitions of GreetingService in this file, but you probably already have done such. For older versions of GWT you also have to add the line <servlet path="/TodoService" class="myapp.server.generated.TodoServiceImpl"/> to the Todo.gwt.xml file, but that is not needed in recent versions of GWT. Change the Todo.css fileReplace the content of Todo.css with : Add JDBC jar to build pathHighlight project 'Todo' in the package explorer, click Properties, and select 'Java Build Path'. Click on the tab 'Libraries', and here you add the postgresql JDBC jar file, I'm using this one: postgresql-8.4-701.jdbc4.jar. Launch the appHighlight project 'Todo' again in the package explorer, and the click the green 'Run' button. This should launch your application in Hosted mode', and it should show you a todo list with 4 entries.
In case you have an error, then the 'ok' will be replaced by an error in red. Next stepProceed now to part 2. |